
You can turn off autocorrect in Word if you don’t want Word automatically changing your capitalization, spelling, or other typing as you work. The setting is easy to change, and you can disable only the options you don’t want.
In this guide, you’ll learn how to open Word’s AutoCorrect settings, disable automatic changes, and test that your new settings are working correctly.
Why Turn Off AutoCorrect in Word?
AutoCorrect can be useful, but it isn’t always helpful. Word may automatically capitalize words, correct typing, or make other changes that you don’t want.
Turning off the relevant AutoCorrect settings gives you more control over what happens while you type. You can disable everything you don’t need or simply switch off one specific option.
- Stop unwanted automatic capitalisation.
- Prevent certain automatic corrections.
- Keep the AutoCorrect features that you still find useful.
Watch the Video Tutorial
If you prefer to see this in action, the full video walkthrough is below, showing each method step by step.
How to Turn Off Autocorrect in Word: Step-by-Step
There are two useful approaches. First, open the AutoCorrect settings and disable the options you don’t want. Second, you can test the settings with examples to make sure Word has stopped making the changes.
Method 1: How to Turn Off Autocorrect in Word Using Options
The main AutoCorrect controls are inside Word Options. From there, you can open the AutoCorrect window and choose which automatic changes to disable.
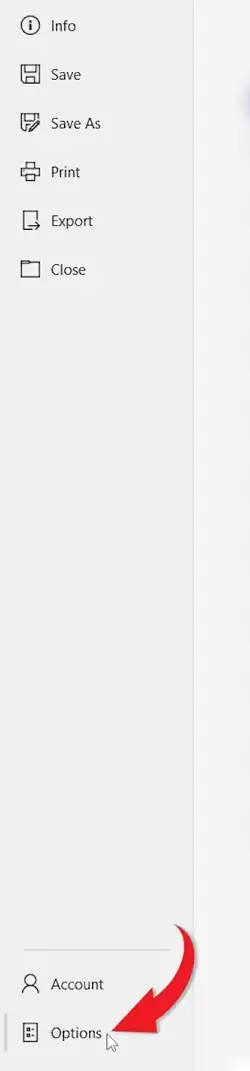
- Click File at the top of the ribbon

- Select Options at the bottom of the menu.
- Select Proofing from the list on the left.
- Find the AutoCorrect Options section.
- Click the AutoCorrect Options button.

👉 A new window containing the AutoCorrect settings will open.
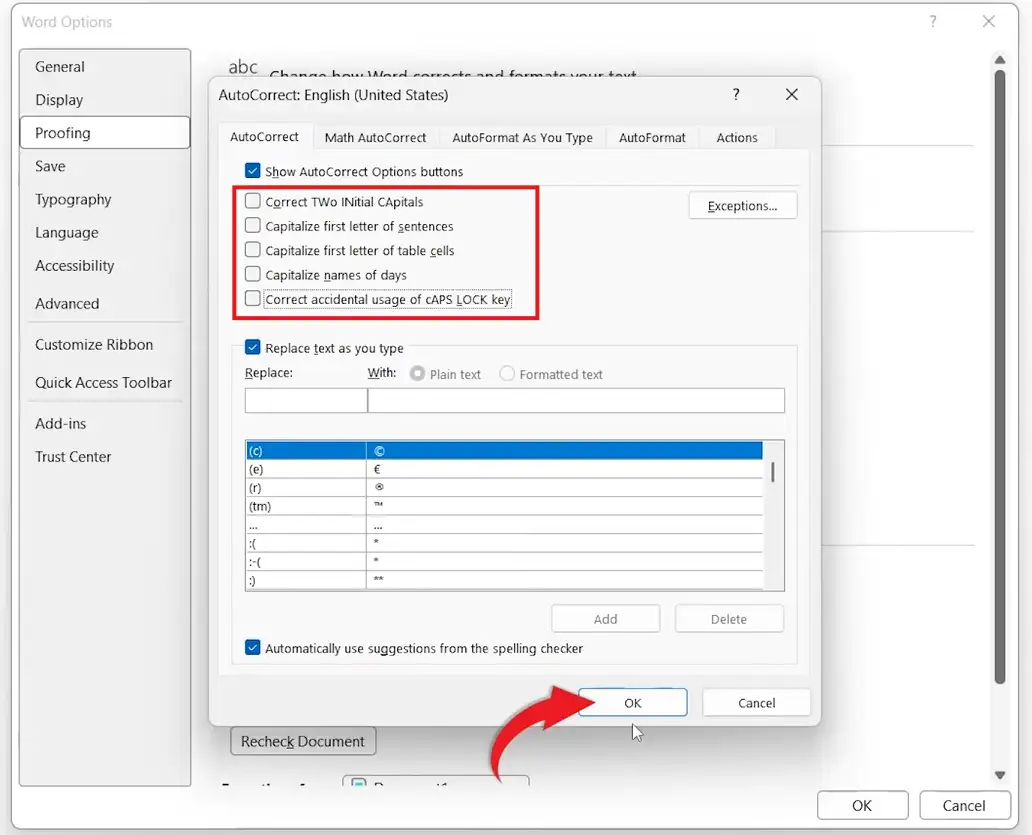
Select the AutoCorrect tab
Make sure the AutoCorrect tab is selected. This is where you’ll find the settings that control Word’s automatic changes.
Untick the options you want to disable
The video demonstrates unticking five AutoCorrect options. However, you don’t have to turn everything off. You can untick only the settings that are causing problems.
- Disable unwanted automatic capitalisation.
- Stop specific automatic corrections.
- Leave useful AutoCorrect features enabled.
Save your AutoCorrect settings
Once you’ve made your changes, click OK. Then click OK again to close the Word Options window.
👉 Your selected AutoCorrect settings are now changed.
Method 2: How to Turn Off Autocorrect in Word by Testing Settings
After changing AutoCorrect, test a few examples to make sure Word is no longer making the unwanted changes.
Test automatic capitalisation
Type a word such as monday and check whether Word automatically changes the first letter to a capital letter.
You can also type a sentence such as hello world and check whether Word automatically changes the first letter of the sentence.
Finally, deliberately type two capital letters next to each other and check whether Word changes them automatically.
👉 If Word leaves your text as you typed it, the relevant AutoCorrect setting has been disabled successfully.
If you’re working on the appearance of your document as well, you may also want to learn how to change text case in Word.
Which Method Should You Use?
| Method | Best for |
|---|---|
| Change AutoCorrect options | Disabling specific automatic corrections |
| Test your settings | Checking that Word has stopped making unwanted changes |
My pick: Change only the AutoCorrect options you don’t want. Then test your typing to confirm the changes have worked.
Common Problems When Turning Off Autocorrect in Word
Word still capitalises my words
Return to File → Options → Proofing → AutoCorrect Options and check that the relevant capitalisation setting has been unticked.
Word still corrects my typing
Review the other options on the AutoCorrect tab. You may have disabled one setting while another setting is still responsible for the change.
I can’t find AutoCorrect Options
Click File, select Options, and then choose Proofing. The AutoCorrect Options button is located in this section.
AutoCorrect changes text I want to keep
Don’t disable every AutoCorrect setting unnecessarily. Identify the specific option causing the change and untick that setting instead.
Pro Tips for Controlling AutoCorrect in Word
- Disable only the AutoCorrect options you don’t need rather than switching everything off.
- Test your settings with a few examples immediately after changing them.
- Remember that Word’s automatic formatting and text behaviour can be controlled through several different settings.
- For more useful shortcuts and commands, keep the Microsoft Word keyboard shortcuts cheat sheet nearby — it can save you time when working in Word.
Other Word Settings to Customise
Once you’ve changed AutoCorrect, you may want to customise other parts of Word to make typing and formatting more consistent.
- How to Change the Default Font in Word
- How to Change Font Size in Word
- How to Change Font Colour in Word
FAQs
How do I turn off autocorrect in Word?
To turn off autocorrect in Word, go to File → Options → Proofing → AutoCorrect Options. Select the AutoCorrect tab and untick the options you want to disable.
How do I stop Word from automatically capitalising words?
Open File → Options → Proofing → AutoCorrect Options and untick the relevant automatic capitalisation setting.
Why does Word keep correcting my words?
Word may still have one or more AutoCorrect options enabled. Review the settings under File → Options → Proofing → AutoCorrect Options.
Can I turn off only some AutoCorrect options?
Yes. You can untick only the AutoCorrect options you don’t want while leaving the other automatic corrections enabled.
Where are AutoCorrect settings in Word?
AutoCorrect settings are under File → Options → Proofing → AutoCorrect Options.
How do I stop Word changing two capital letters?
Open AutoCorrect Options and disable the setting that automatically corrects accidental use of two initial capital letters.
Can I turn AutoCorrect back on in Word?
Yes. Return to the AutoCorrect Options window and tick the settings you want Word to use again.
Does turning off AutoCorrect remove existing changes?
No. Changing AutoCorrect settings affects future automatic changes. Text that Word has already changed will need to be corrected manually.
Conclusion
You can now turn off autocorrect in Word by opening File → Options → Proofing → AutoCorrect Options and unticking the automatic changes you don’t want.
You don’t necessarily need to disable every AutoCorrect feature. In most cases, it’s better to switch off only the settings that are causing unwanted changes.
Once you’ve finished, you can continue customising Word to suit the way you work — for example, learn how to change the default font in Word for more consistent formatting.
New to Word? This tutorial goes with Chapter 3 of the free Microsoft Word Beginners Hub: Typing and editing. It covers the basics step by step, with screenshots, short videos and practice files.
Related Tutorials
- How to Change Text Case in Word
- How to Remove Formatting Marks in Word
- How to Change the Font in Word
Word Tutorials
Recently Added on Word Made Easy
Browse the complete collection for help with formatting, layout, pages, tables, images, and document setup.
For Microsoft support documentation, visit the official Microsoft guidance.
Leave a Reply