
How to put text over an image in Word is straightforward: insert the picture, change its wrapping so it can move freely, then place a Text Box or WordArt on top. Use a Text Box for sentences and WordArt for a short decorative heading.
This guide shows both methods, including how to remove the Text Box background, control the layer order and group the finished objects. If your picture is not in the document yet, begin with How to Insert a Picture in Word: 3 Easy Methods (Quick Guide).
What Does Putting Text Over an Image Mean?
Putting text over an image means stacking two separate objects: a picture underneath and a Text Box or WordArt object above it. This gives you independent control over the wording, font, colour, position and effects without permanently changing the original picture.
The essential step is changing the picture from In Line with Text to a wrapping option that allows free positioning. If the picture still feels locked to a paragraph, follow the complete guide to moving an image freely in Word.
- Use a Text Box for several words, captions or short paragraphs.
- Use WordArt for a short title that needs a decorative fill, outline or effect.
- Use desktop Word for Windows for the steps below. Word for Mac has similar tools, but their positions may differ. If a command is missing in Word for the web, open the document in the desktop app.
Microsoft also documents Text Box and WordArt methods for adding text on top of a photo.
Watch the Video Tutorial
If you prefer to see this in action, the full video walkthrough is below, showing each method step by step.
How to Put Text Over an Image in Word
Prepare the picture first. Both overlay methods depend on the picture being movable rather than fixed in line with the surrounding text.
Insert the Picture
- Place the cursor where you want to add the picture.
- Open the Insert tab.
- Select Pictures and then This Device.
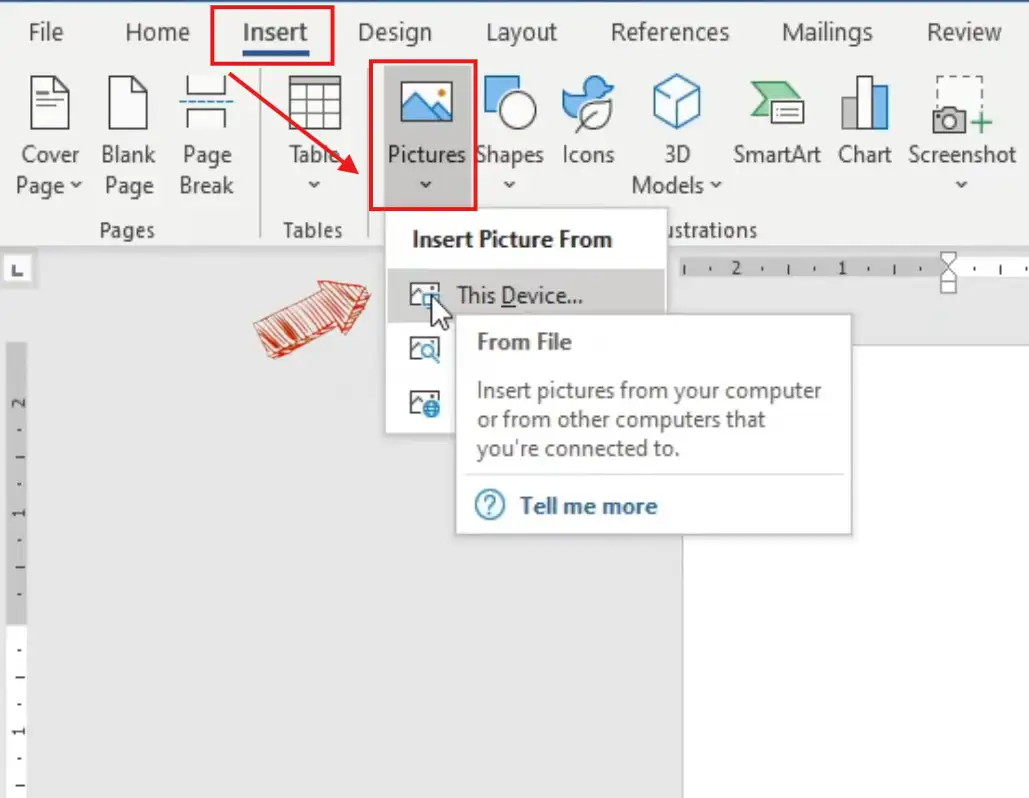
- Browse to the image file and select it.
- Select Insert.

👉 The picture appears at the cursor position.
Change the Picture Wrapping
- Select the picture.
- Open Picture Format and select Wrap Text.
- Choose Square. This keeps normal document text around the picture while allowing you to move the image.

👉 You can now drag the picture without it behaving like a large text character.
Method 1: Put Text Over an Image Using a Text Box
Use a Text Box when your overlay contains a caption, label or more than a few words. It gives you a normal rectangular writing area that can be resized independently of the picture.
How to Put a Text Box Over a Picture in Word
- Open the Insert tab.
- Select Text Box and choose Draw Text Box.
- Drag across the picture to draw the box.
- Type the wording you want to display.

Make the Text Box Transparent
- Select the outside border of the Text Box.
- Open Shape Format, select Shape Fill, and choose No Fill.
- Select Shape Outline and choose No Outline.
- Drag the Text Box border to position the wording over the picture.
- Select the text and format its font, size and colour from the Home tab. For precise colour choices, see How to Change Font Color in Word: 3 Easy Methods.
👉 Only the text remains visible over the picture; the Text Box background and border disappear.
Method 2: Put Text Over an Image Using WordArt
Use WordArt for a short heading, poster title or invitation text. WordArt provides built-in text fills, outlines and effects that are not available from an ordinary Text Box in the same way.
Insert and Position WordArt
- Open the Insert tab and select WordArt.
- Choose a simple style and replace the sample wording with your own text.
- Select the outside edge of the WordArt object and drag it over the picture.
- To centre it on the page, open Shape Format, select Align, and choose Align Center. Check the active alignment setting if the object centres against another selected item instead of the page.
Style the WordArt
- Text Fill changes the colour or fill inside the letters.
- Text Outline adds a contrasting edge that can improve readability.
- Text Effects adds options such as shadow, reflection, glow and transformation.
👉 The WordArt now sits above the picture as a separate, movable title.
Which Method Should You Use?
| Method | Use it for | Main advantage |
|---|---|---|
| Text Box | Captions, labels and several lines of text | More control over a rectangular area of normal text |
| WordArt | Short titles, headings and decorative wording | Built-in fills, outlines and text effects |
Choose a Text Box when readability and space matter most. Choose WordArt when the wording is short and needs to stand out visually.
Common Problems with Text Over Images
The Picture or Text Will Not Move
Select the object and change Wrap Text from In Line with Text to Square or another wrapping option. Microsoft explains that objects must use a wrapping option other than In Line with Text before you can position and multi-select them freely in its guidance for moving WordArt, Text Boxes and shapes in Word.
The Text Box Covers the Picture
Select the Text Box border and apply Shape Fill → No Fill. Choose Shape Outline → No Outline if you also want to remove the visible border.
The Text Appears Behind the Picture
Select the Text Box or WordArt, open Shape Format, and choose Bring Forward or Bring to Front. You can also select the picture and use Send Backward.
The Group Command Is Unavailable
Check that neither object is set to In Line with Text. Hold Ctrl while selecting the picture and the text object by their outside edges, then use Shape Format → Group → Group. If Word still will not group them, place the objects inside a New Drawing Canvas and try again.
The Text Is Difficult to Read
Use a contrasting font colour, add a subtle outline, or place a semi-transparent shape behind the words. Avoid detailed areas of the picture, especially when the overlay contains more than a short heading.
Pro Tips for Text Over Images
- Keep essential information in normal document text as well as in the visual overlay so the document remains accessible.
- Resize from a corner handle to keep the picture’s proportions.
- Use a short heading over a busy image; long paragraphs are easier to read in a separate content area.
- When the picture competes with the wording, learn how to make an image transparent in Word.
- Group the picture and text only after their size, position and layer order are correct.
- To turn text sideways, see How to Rotate Text in Word.
FAQs
How do I put text over an image in Word?
Insert the picture, change its Wrap Text setting so it can move freely, then add a Text Box or WordArt and drag it over the picture. Use No Fill and No Outline when you want only the text to remain visible.
Should I use a Text Box or WordArt over a picture?
Use a Text Box for captions, labels and several lines of text. Use WordArt for a short decorative title that needs fills, outlines or effects.
How do I remove the white background from a Text Box?
Select the Text Box border, open Shape Format, and choose Shape Fill → No Fill. Choose Shape Outline → No Outline to remove the border as well.
Why can’t I move the text over the picture?
The object may be set to In Line with Text. Select it, open Wrap Text, and choose Square or another wrapping option that allows free positioning.
How do I bring text in front of a picture in Word?
Select the Text Box or WordArt, open Shape Format, and choose Bring Forward or Bring to Front. You can also send the picture backward.
Can I group the text and picture together?
Yes. Make sure neither object is set to In Line with Text, hold Ctrl while selecting both outside edges, and then choose Shape Format → Group → Group.
Does this work in Word for the web?
Word for the web has fewer positioning and object-formatting controls than desktop Word. If a required command is unavailable, open the document in the desktop app.
Conclusion
To put text over an image in Word, prepare the picture with a movable wrapping option and then add either a Text Box or WordArt. A transparent Text Box suits captions and longer wording, while WordArt is better for a short decorative title.
Finish by checking contrast, positioning and layer order. When everything is in the right place, follow How to Group Objects in Word: 3 Easy Steps so the picture and text move together.
Related Tutorials
- How to Insert a Picture in Word: 3 Easy Methods (Quick Guide)
- How to Move an Image Freely in Word: 5 Easy Steps (Quick Guide)
- How to Group Objects in Word: 3 Easy Steps
Word Tutorials
Recently Added on Word Made Easy
Browse the complete collection for help with formatting, layout, pages, tables, images, and document setup.
For Microsoft support documentation, visit the official Microsoft guidance.

Leave a Reply