
To adjust space between words in Word, select the space, open Home → Font → Advanced, and choose Expanded or Condensed under Spacing. Enter a point value in By, then click OK. Selecting only the space keeps the adjustment targeted to that gap.
This guide covers Word for Windows, including Microsoft 365 and Word 2024. You will learn how to select one space, widen or narrow it, and restore normal spacing. If your problem is vertical gaps between lines, follow how to change line spacing in Word instead.
What Is Word Spacing?
Word spacing is the horizontal gap between words. An ordinary space is a character, so you can select it and adjust its spacing through the Font dialog box. Selecting a whole sentence also changes spacing between its letters; select only the space when you want to change one gap.
Use a targeted spacing adjustment when:
- One correctly typed space needs a small visual adjustment.
- You need a wider gap between two words in a heading or short label.
- You want to narrow one gap without changing the surrounding letters.
Watch the Video Tutorial
If you prefer to see this in action, the full video walkthrough is below, showing each method step by step.
Method 1: Make a Space Between Words Wider
This method lets you make one selected space wider by increasing its character spacing.
Select One Space
- Open your document and go to the Home tab.
- Click Show/Hide ¶ in the Paragraph group. Word displays ordinary spaces as dots, helping you find the gap to select.
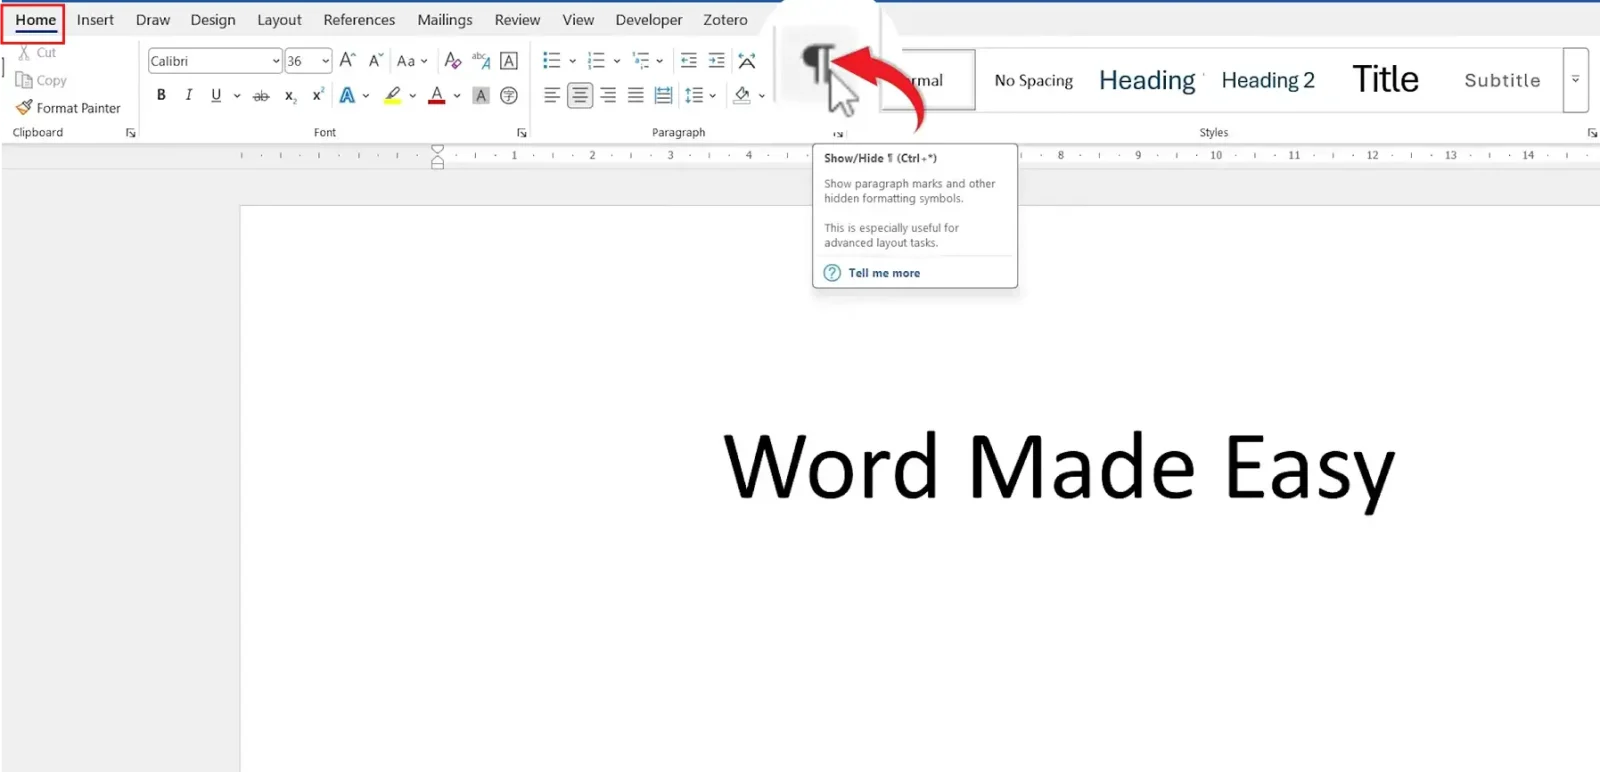
- Place the cursor immediately before the space you want to change, at the end of the first word.
- Hold Shift and press Right Arrow once to select the space immediately before the next word.

👉 Only the space should be highlighted. If a letter is highlighted too, click before the space and select it again.
Expand the Space
- With the space selected, open the Home tab if necessary.
- In the Font group, click the small arrow in the bottom-right corner.
- Select the Advanced tab.
- Open the Spacing drop-down menu and select Expanded.
- Enter a small amount, such as
1 pt, in the By box, then click OK. Increase it if you need a wider gap. - Check the result. If another gap needs the same adjustment, select that space and repeat the steps with the same point value.
👉 The selected gap is now wider. Repeat the process for any other spaces that need the same adjustment.
Method 2: Make a Space Between Words Narrower
To make an individual gap smaller, you can use the same Font settings but choose condensed spacing instead.
Select the Space and Open Font Settings
- Click Show/Hide on the Home tab so that the spaces between words are visible.
- Drag across the space you want to change, or place the cursor immediately before it, hold Shift, and press Right Arrow once.
- Open the Font dialog box by clicking the small arrow in the Font group.

- Select the Advanced tab and open the Spacing drop-down menu.
- Select Condensed under Spacing. Enter a small amount, such as
0.5 pt, in By, then click OK.
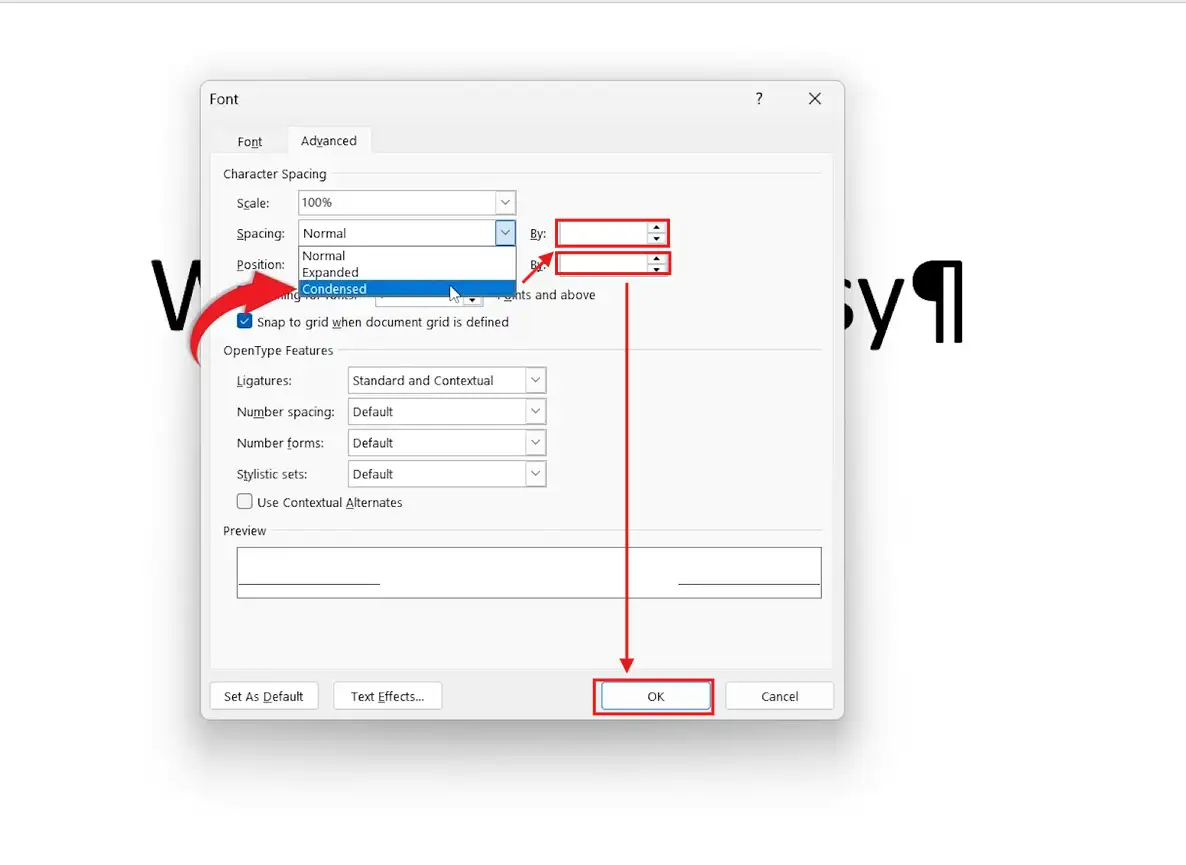
👉 Check that the words still have a clear gap between them. Reduce the condensation if they look crowded.
Hide the Formatting Marks
- Return to the Home tab.
- Click Show/Hide again to remove the visible dots between words.
👉 With formatting marks hidden, you can view the final spacing without the dots showing in your document.
Which Method Should You Use?
| Option | Best For |
|---|---|
| Expanded | Making a selected space wider |
| Condensed | Making a selected space narrower |
| Normal | Restoring the selected space to normal character spacing |
Common Problems
The Space Is Not Selected
Turn on Show/Hide so that the dots representing spaces are visible. Then select only the dot between the two words.
The Wrong Word Spacing Changed
Make sure only the intended space is selected before opening the Font dialog box. Selecting additional text can apply the spacing change beyond the gap you intended to modify.
The Spacing Looks Uneven
First check what is causing the gap. Several dots indicate repeated spaces; remove the unnecessary ones rather than condensing them. An arrow indicates a tab, which needs a tab or layout adjustment. If a paragraph is justified, Word spreads text across the line: try Home → Paragraph → Align Left if that suits your document.
How to Restore Normal Word Spacing
Select the adjusted space, reopen Home → Font → Advanced, and choose Normal under Spacing. Click OK. This resets the character-spacing adjustment without requiring you to replace the text.
The Dots Are Still Visible
Click Show/Hide ¶ on the Home tab again. If dots remain, go to File → Options → Display and check Spaces and Show all formatting marks. Clear the options you do not want enabled, then click OK. The dots do not print.
Pro Tips for Word Spacing
- Use Show/Hide whenever you need to identify an individual space precisely.
- Use the same point value when matching several spaces so the result stays consistent.
- Keep adjustments small and check readability at your usual viewing size. A point value adds or removes spacing; it does not set the gap to that total width.
- If you find repeated double spaces throughout a document, use Find and Replace carefully to remove the extra characters, checking that intentionally spaced content is preserved.
Microsoft explains the Expanded and Condensed settings in its guide to changing character spacing. Select only the space when you want to adjust that gap rather than the surrounding letters.
FAQs
How do I adjust space between words in Word?
Select the space, open Home → Font → Advanced, then choose Expanded or Condensed under Spacing. Enter a point value in By and click OK.
Can I change one gap without changing letter spacing?
Yes. Select only the space between the two words before applying the adjustment. Selecting the surrounding words applies character spacing to their letters too.
Does Expanded change the number of spaces?
No. Expanded changes character spacing for the selected content. It does not insert another space character.
Why are the gaps so large in justified text?
Justified alignment spreads text across the line, which can widen gaps between words. If your layout allows it, use Align Left instead of adjusting each space individually.
How do I remove an expanded or condensed space?
Select the space and return to the Advanced tab in the Font dialog box. Choose Normal under Spacing and click OK.
Why are dots still visible after turning off Show/Hide?
Spaces may be set to display permanently. In Word for Windows, check File → Options → Display and clear Spaces or Show all formatting marks as appropriate.
Is word spacing the same as line spacing?
No. Word spacing changes horizontal gaps between words. Line spacing controls the vertical distance between lines of text.
Which version of Word do these steps cover?
The ribbon and dialog-box steps in this guide cover Word for Windows. Use the Windows desktop app when following this procedure; Mac and web interfaces differ.
Conclusion
To adjust space between words in Word, select the individual space and use the Advanced spacing controls in the Font dialog box. Choose Expanded when you want more space or Condensed when you want less.
Check for extra spaces, tabs or justified alignment before changing individual gaps. For a small visual adjustment, start with a low point value and restore Normal spacing if you want to undo it.
Keep your document readable by changing only the gaps that need attention. For wider formatting changes, see how to change font size in Word.
Related Tutorials
- How to Remove Formatting Marks in Word
- How to Change Font Size in Word
- How to Change Line Spacing in Word
Word Tutorials
Recent Microsoft Word Tutorials
Browse the complete collection for help with formatting, layout, pages, tables, images, and document setup.
For Microsoft support documentation, visit the official Microsoft guidance.
Leave a Reply