What if you could turn a simple document into a professional, interactive form-without printing, PDFs, or complicated tools?
With Microsoft Word, you can create fillable forms where users simply click and type directly into fields. This is perfect for:
- Job applications
- Contact forms
- Surveys
- Registration documents
In this guide, you’ll learn how to create a fully functional fillable form using Word’s hidden Developer tools.
What Is a Fillable Form in Word?
A fillable form is a document that contains interactive fields where users can enter information digitally.
Instead of static text, you create areas where users can:
- Type their name
- Enter an email address
- Add contact details
- Fill out structured information
These forms are powered by a feature called Content Controls, specifically the Rich Text Content Control — and once your form is complete, if you need to combine it with other documents you can learn how to merge multiple Word documents into one file.
Why Use Fillable Forms in Word?
Creating forms directly in Word offers several advantages:
- No need for external software
- Easy to share and edit
- Works across most devices
- Saves time and paper
- Keeps formatting clean and consistent
Watch the Video Tutorial
If you prefer to see this in action, the full video walkthrough is below, showing each method step by step.
Enable the Developer Tab in Word
By default, the tools needed to create forms are hidden.
To enable them:
- Click File
- Select Options
- Go to Customize Ribbon
- Find and tick Developer
- Click OK

Once enabled, you’ll see the Developer tab appear in the ribbon.
Create Your Form Layout
Before adding fields, design your form structure.
For example:
- Name
- Email Address
- Address
- Phone Number
These act as labels that guide the user.
💡 Tip: Think of this like building a digital version of a paper form.
Insert Fillable Fields (Rich Text Content Control)
Now for the most important step-adding interactive fields.
Steps:
- Place your cursor next to a label (e.g., “Name”)
- Go to the Developer tab
- Click the Rich Text Content Control (icon with Aa and lines)

A field will appear where users can type.
Format Your Fields
You can customize how your fields look to match your document style.
- Change font type
- Adjust font size
- Align with labels
💡 You can copy and paste fields (Ctrl + C / Ctrl + V) to save time when creating multiple inputs.
Add Placeholder Instructions
Want to guide users on what to enter?
You can add helpful placeholder text inside each field.
Steps:
- Click on the content control
- Go to Developer → Properties
- Enter text in the Title field (e.g., “Enter your full name here”)
- Click OK
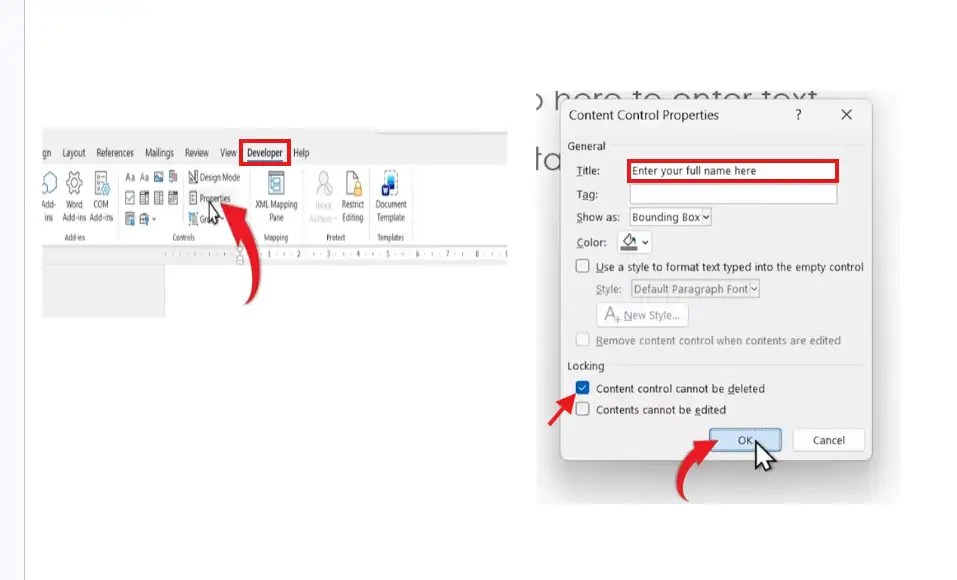
This text will disappear when the user starts typing.
Protect Your Form (Restrict Editing)
To prevent users from editing anything except the fields:
Steps:
- Go to Developer tab
- Click Restrict Editing
- Tick Allow only this type of editing
- Select Filling in forms
- Click Start Enforcing Protection
(Optional: Add a password) — and if you want to go further with document security, you can also learn how to password protect a Word document so only authorised users can open it at all.
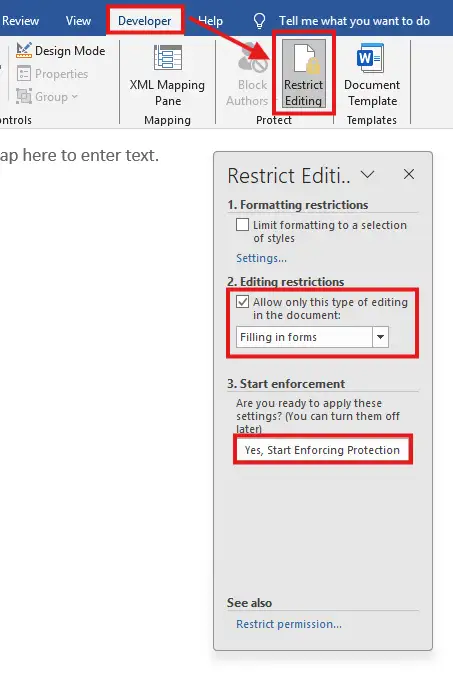
Now users can only interact with the form fields not the rest of the document.
Test Your Fillable Form
Once complete:
- Click inside fields and type
- Ensure placeholders disappear correctly
- Confirm that non-editable areas are locked
This ensures your form works exactly as intended.
Best Use Cases for Word Fillable Forms
These types of forms are ideal for:
- Employee onboarding documents
- Client intake forms
- Internal business templates
- Event registrations
- Feedback and survey forms
Pro Tips for Better Forms
- Keep layouts simple and clean
- Use consistent spacing
- Add clear instructions for each field
- Test before sharing
- Use protection to avoid accidental edits
FAQs
Can users edit the form structure?
No, not if you enable editing restrictions. They can only fill in the fields.
Do I need special software to open the form?
No. Anyone with Microsoft Word can open and complete it.
Can I add more advanced fields (dropdowns, checkboxes)?
Yes. The Developer tab includes additional controls like dropdown lists and checkboxes — for a full walkthrough of adding interactive checkboxes, see the guide on how to insert a clickable checkbox in Microsoft Word.
Can I remove protection later?
Yes. Simply go back to Restrict Editing and stop enforcement.
Is this better than using PDFs?
It depends. Word forms are easier to edit and create, while PDFs are better for fixed, secure distribution.
Conclusion
Creating a fillable form in Microsoft Word is a powerful way to streamline data collection without needing extra tools.
By enabling the Developer tab, inserting content controls, and restricting editing, you can build clean, professional forms in minutes.
Once you master this feature, you’ll be able to transform any basic document into an interactive, user-friendly experience.
Related Tutorials
- How to Insert a Clickable Checkbox in Microsoft Word
- How to Password Protect a Word Document
- How to Merge Multiple Word Documents into One File

Recent Microsoft Word Tutorials

Looking for more help with Microsoft Word? Browse all step-by-step Word tutorials covering formatting, layout, pages, and document setup.
👉 View all Microsoft Word tutorials: https://wordmadeeasy.org/microsoft-word/
👉 Need more support – check out the official guidance: https://support.microsoft.com/en-au

Prefer watching instead of reading? Many Word tutorials are also available as short, step-by-step videos on the Word Made Easy YouTube channel.


Leave a Reply