Microsoft Word includes a built-in Change Case tool that lets you change text case in Word instantly — no retyping required. Whether you’ve typed a heading in all caps by accident or need to switch a whole paragraph to sentence case, Word fixes it in a couple of clicks.
In this guide, you’ll learn three ways to change text case in Word: the Change Case button, the Shift + F3 keyboard shortcut, and an AutoCorrect setting that capitalises sentences automatically as you type. If you’re tidying up fonts at the same time, the guide on how to change the font in Word pairs well with this one.
What Is Text Case in Word?
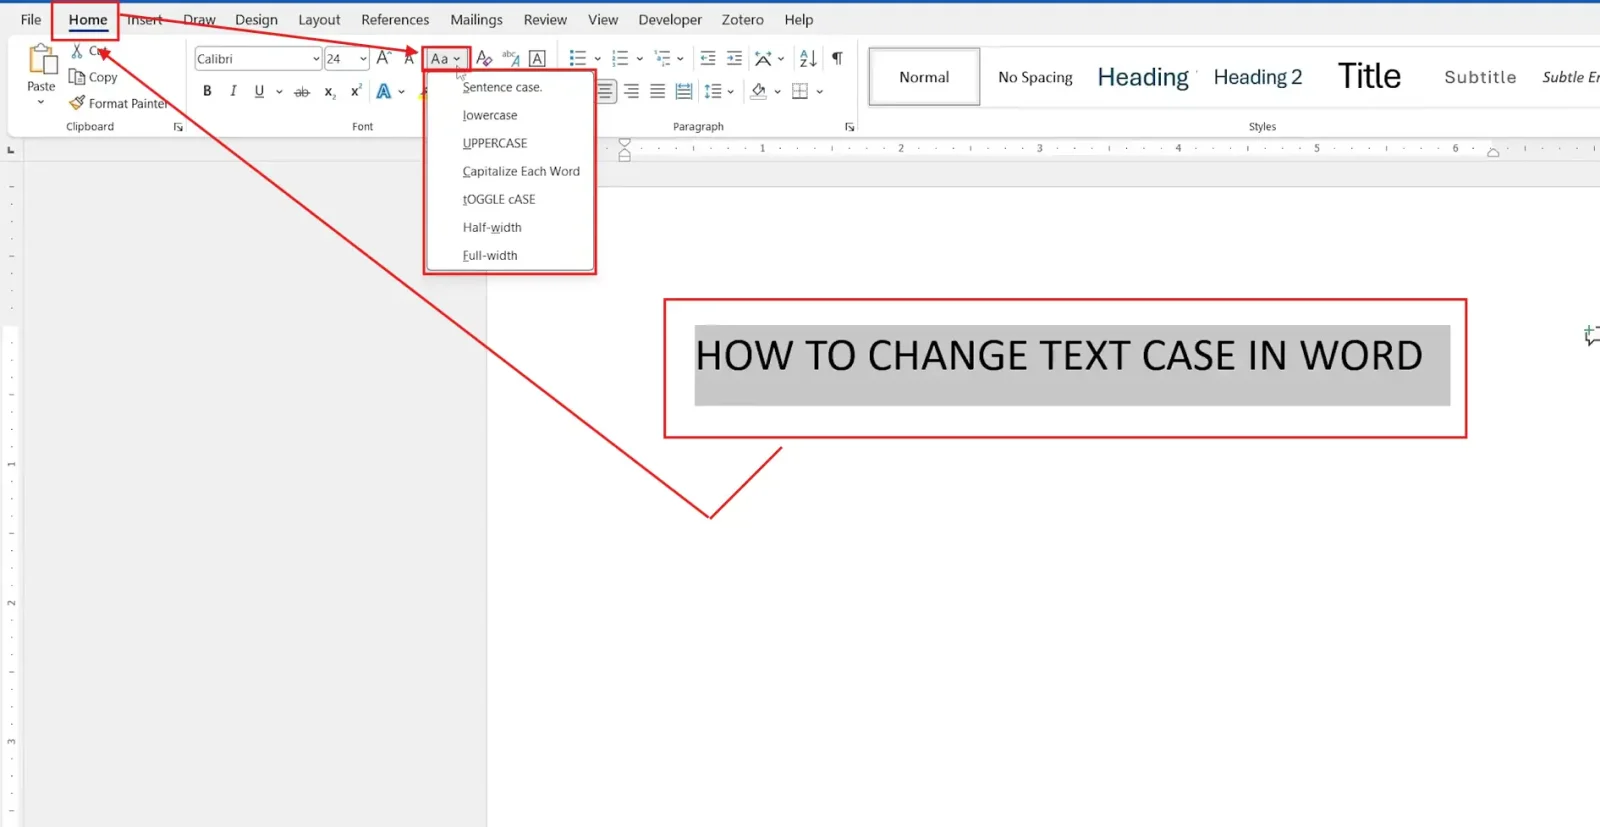
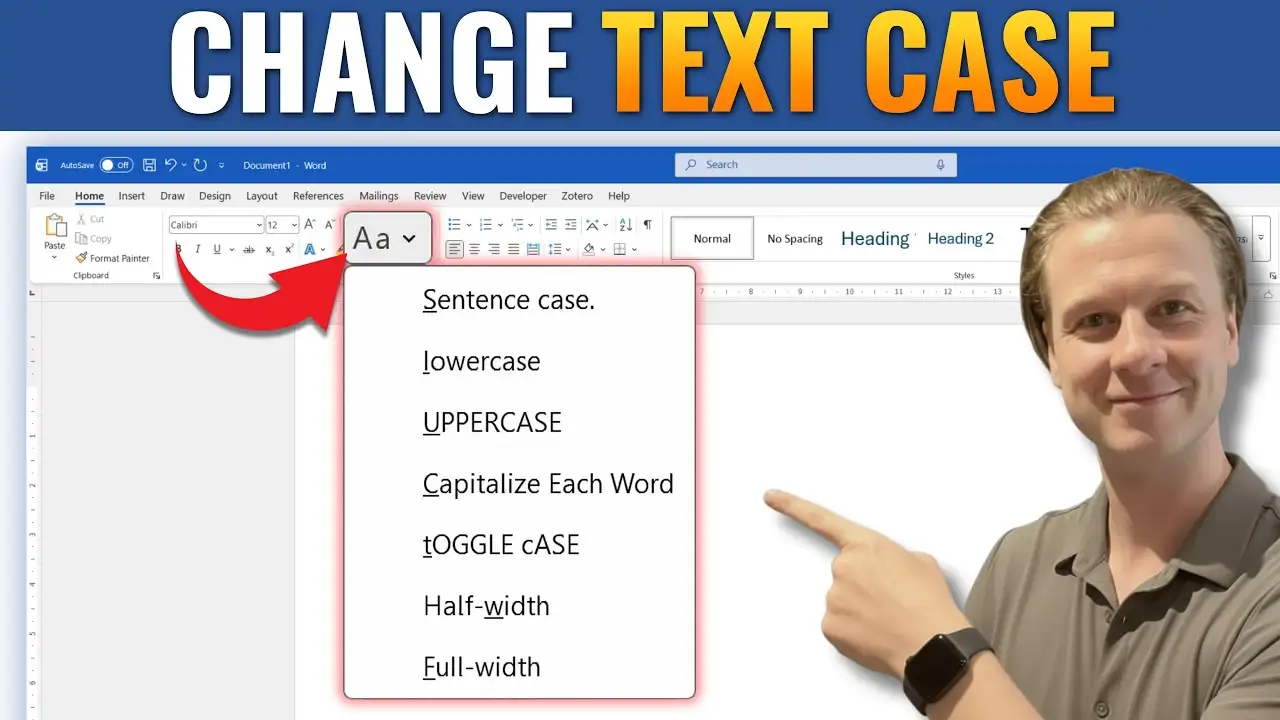
Text case is how the letters in your document are capitalised. Word offers five case formatting options, each suited to a different writing situation:
- Sentence case — capitalises the first letter of each sentence, lowercases the rest
- lowercase — removes all capital letters
- UPPERCASE — capitalises every letter
- Capitalize Each Word — capitalises the first letter of every word
- tOGGLE cASE — flips the capitalisation of every letter
Two quick examples show how this plays out:
Sentence case: THIS IS AN EXAMPLE. → This is an example.
UPPERCASE: hello world → HELLO WORLD
Capitalize Each Word is the option most people reach for on document titles and headings — and if you’re also applying bold, italic, and underline text in Word to those same headings, it’s worth doing both passes together.
Watch the Video Tutorial
If you prefer to see this in action, the full video walkthrough is below, showing each method step by step.
How to Change Text Case in Word: Step-by-Step
Three methods cover almost every situation. Pick the one that fits how you work.
Method 1: How to Change Text Case in Word Using the Change Case Button
The Change Case button is the most direct way to modify text case in Word — it’s built into the ribbon, so there’s nothing to install.
Steps:
- Select the text you want to modify.
- Go to the Home tab.
- Find the Font group.
- Click Change Case (the Aa icon).
- Choose the case option you want from the list.
👉 Word applies the new case instantly — no need to retype anything. For the full list of official options, see Microsoft’s Change Case documentation.
Method 2: How to Change Text Case in Word Using the Shift + F3 Shortcut
If you switch between cases often, the keyboard shortcut is faster than reaching for the ribbon every time.
Steps:
- Select the text.
- Press Shift + F3.
- Keep pressing Shift + F3 to cycle through Capitalize Each Word, lowercase, and Sentence Case.

👉 That’s it. No dropdown menus, no mouse — just three keys. This is the fastest method by far, and pairs nicely with the rest of the Microsoft Word Keyboard Shortcuts Cheat Sheet if you want to speed up other parts of your workflow too.
Method 3: How to Change Text Case in Word Automatically Using AutoCorrect
Methods 1 and 2 fix text that’s already typed. AutoCorrect changes text case in Word as you type, so sentences start with a capital letter automatically from then on.
Steps:
- Go to File → Options → Proofing.
- Click AutoCorrect Options.
- On the AutoCorrect tab, tick Capitalize first letter of sentences.
- Tick Correct accidental use of cAPS LOCK key as well, then click OK
👉 From now on, Word capitalises new sentences as you type — no shortcut needed for that part.
Which Method Should You Use?
- Fixing one heading or a short selection? Use the Change Case button.
- Editing fast and want speed? Use Shift + F3.
- Want Word to stop the problem before it starts? Turn on AutoCorrect.
Common Problems When Changing Text Case in Word
Shift + F3 Isn’t Doing Anything
Some laptops route function keys through the Fn key by default. If Shift + F3 does nothing, press Fn + Shift + F3 instead.
Change Case Button Has No Effect
This almost always means no text is selected. Highlight the text first, then click Change Case again.
AutoCorrect Is Changing Case When You Don’t Want It To
If Word keeps capitalising letters you’ve deliberately lowercased, go back to File → Options → Proofing → AutoCorrect Options and clear the checkbox you enabled in Method 3.
Toggle Case Is Scrambling Acronyms or Names
tOGGLE cASE flips every letter, so it can mangle acronyms like NASA into nasa. Undo with Ctrl + Z and use Sentence case or Capitalize Each Word instead for text containing acronyms.
Pro Tips for Changing Text Case in Word
- Press Ctrl + Z immediately if a case change isn’t what you expected — Word reverts it instantly.
- Select one word by double-clicking it, then apply Shift + F3 — you don’t need to highlight a whole paragraph for small fixes.
- Case changes don’t affect alignment or spacing — pair a case change with proper align text in Word settings for a fully polished layout.
- Small Caps (under Font settings) is a separate visual effect, not a case change — useful for headings that need a more formal look.
FAQs
How do I change text case in Word?
To change text case in Word, select your text, go to Home → Change Case, and pick the option you need — or press Shift + F3 for a quick shortcut version.
How do I change text to uppercase in Word?
Select the text, click Change Case, and choose UPPERCASE.
How do I convert all caps to lowercase in Word?
Highlight the text, click Change Case, and select lowercase. Shift + F3 also gets you there after a couple of presses.
What is the keyboard shortcut for changing text case in Word?
Shift + F3 cycles through Capitalize Each Word, lowercase, and Sentence Case each time you press it.
Why doesn’t Shift + F3 work on my laptop?
Many laptops need Fn + Shift + F3 instead, since the function keys default to media or brightness controls.
How do I stop Word from automatically capitalising letters?
Go to File → Options → Proofing → AutoCorrect Options and clear the capitalisation checkboxes on the AutoCorrect tab.
Can I automatically capitalise headings and titles?
Yes — select the heading text, click Change Case, and choose Capitalize Each Word. If you’re standardising headings across a long document, combine it with consistent font sizing in Word for a uniform look.
Conclusion
The Change Case button and the Shift + F3 shortcut cover almost every time you need to change text case in Word, and AutoCorrect handles the rest automatically as you type.
Use the button for one-off fixes, the shortcut when you’re moving fast, and AutoCorrect if you want Word to stop the problem before it starts.
Once your capitalisation is sorted, copy that formatting consistently across the rest of the document with the Format Painter in Word.
Related Tutorials
- Microsoft Word Keyboard Shortcuts Cheat Sheet
- How to Align Text in Word
- How to Change the Font in Word

Recent Microsoft Word Tutorials

Looking for more help with Microsoft Word? Browse all step-by-step Word tutorials covering formatting, layout, pages, and document setup.
👉 View all Microsoft Word tutorials: https://wordmadeeasy.org/microsoft-word/
👉 Need more support – check out the official guidance: https://support.microsoft.com/en-au

Prefer watching instead of reading? Many Word tutorials are also available as short, step-by-step videos on the Word Made Easy YouTube channel.


Leave a Reply