
To stop pages appearing side by side in Word, open View and change Page Movement to Vertical. If pages still sit beside each other, choose One Page or increase the zoom. These display settings do not change the document’s printed layout.
This guide covers Microsoft Word for Windows. For related instructions, see How to View Two Pages Side by Side in Word: 2 Easy Methods (Quick Guide).
Why Does Word Show Pages Beside Each Other?
Two settings can produce a similar appearance. Side to Side changes how you move through the document, while a low zoom level can fit several pages across a wide window even with Vertical movement selected. Identify which behaviour you see so you can change the right setting.
Watch the Video Tutorial
If you prefer to see this in action, the full video walkthrough is below, showing each method step by step.
Step 1: Switch Page Movement to Vertical
Start here when the mouse wheel moves across the document horizontally or pages turn from left to right. The Side to Side option can also make the usual zoom controls unavailable.
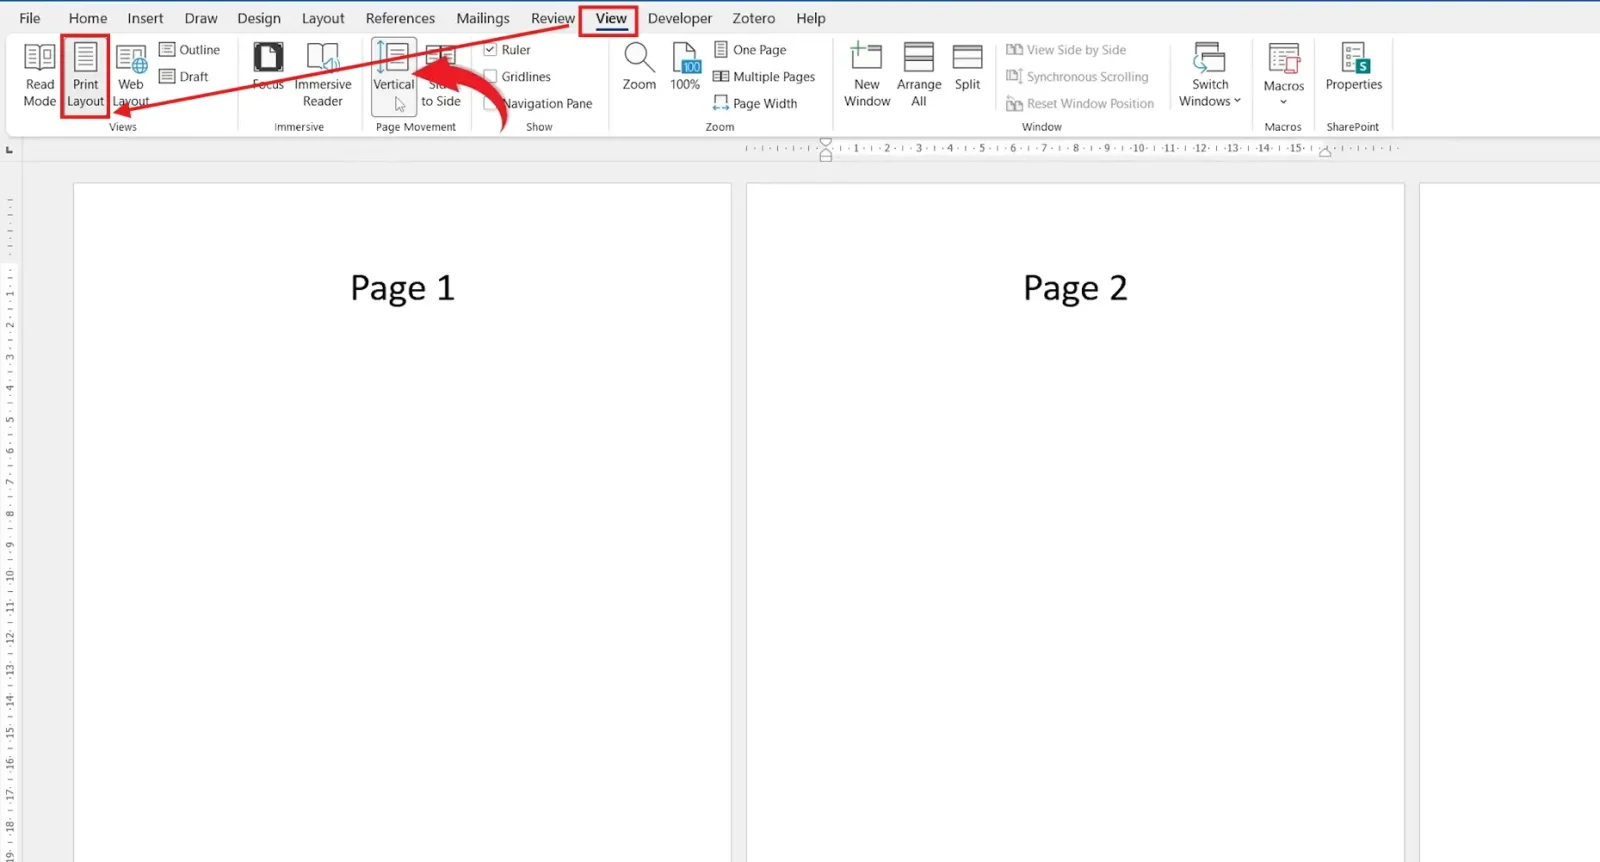
- Open the document in the Windows desktop version of Word.
- Select the View tab. If necessary, choose Print Layout to show the printed pages.
- In Page Movement, select Vertical.
- Scroll through the document to check that movement is now up and down.
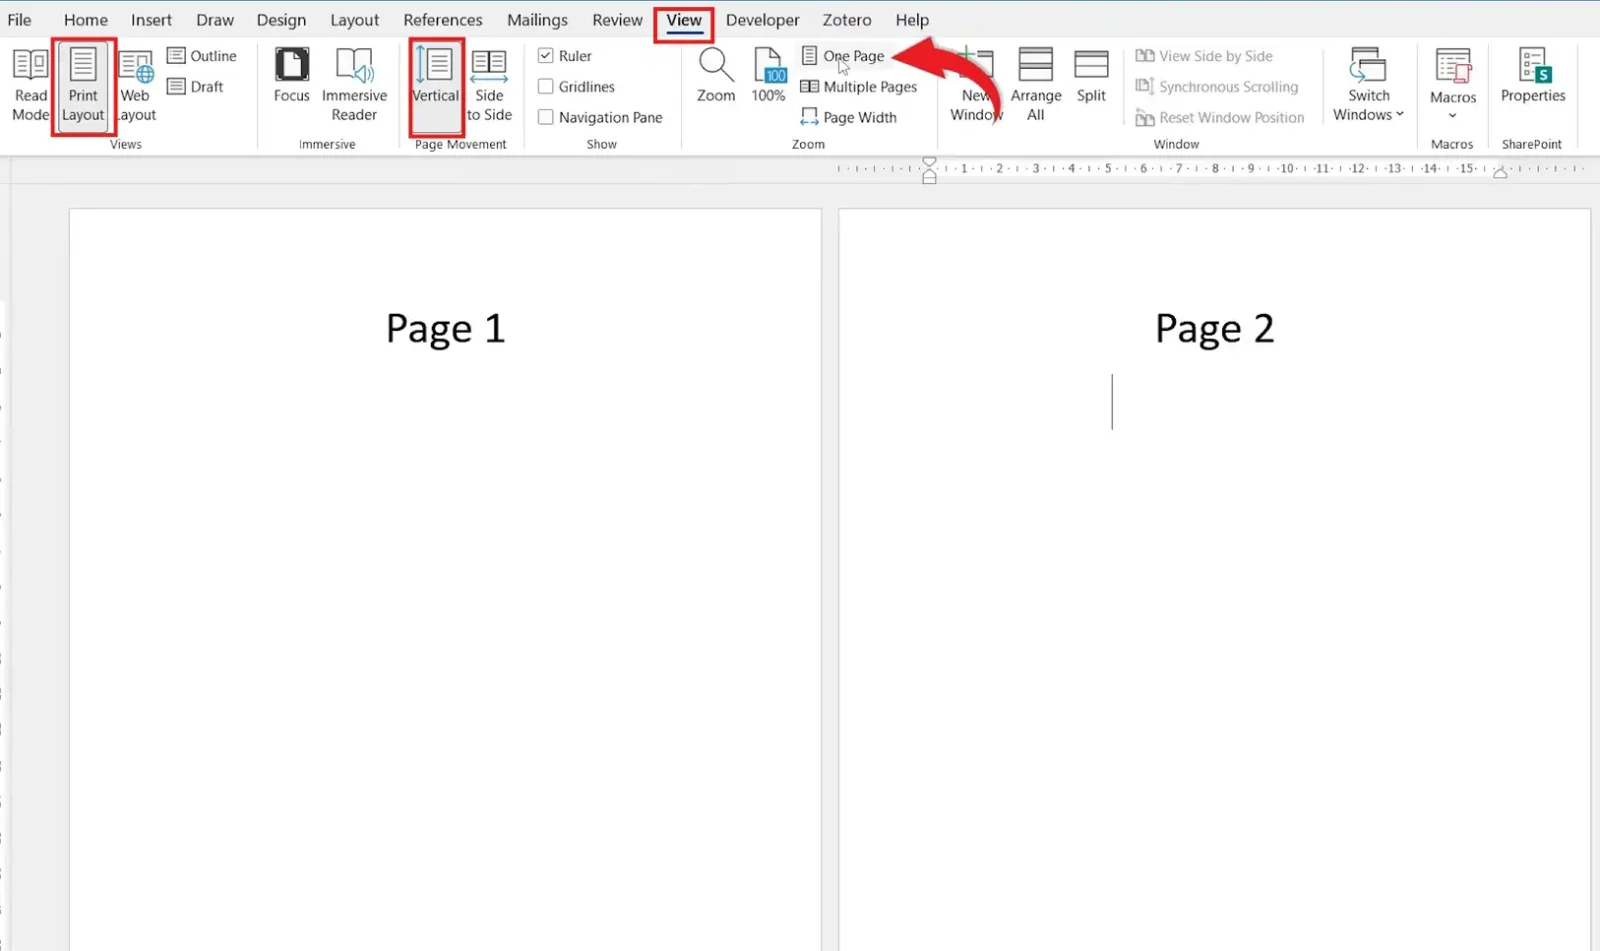
Microsoft explains that Side to Side disables zoom selection. Returning to Vertical restores those controls. See Microsoft’s page movement guide for the difference between the two modes.
Step 2: Adjust Zoom to Show One Page
Use this step when scrolling already works vertically but two pages still fit across the window. The document can remain in Vertical mode while displaying several pages at a small scale.
- Keep Vertical page movement selected.
- On View, find the Zoom group.
- Choose One Page to fit a complete page in the window.
- If the text is too small, increase the zoom using the slider on the status bar. Stop when a comfortable page width fills the available space.
One Page prioritises seeing the whole sheet, so it can make text small on a short window. For writing and proofreading, a larger zoom level is usually easier to read. You may need to scroll down the page, which is normal.
There is no single zoom percentage that guarantees the same appearance on every screen. Window width, display scaling and page size all affect how many pages Word can fit across the workspace.
Choose the Setting That Matches the Problem
- Pages move left and right: select Vertical page movement.
- Pages move up and down but appear in pairs: increase zoom or choose One Page.
- Two separate documents appear beside each other: you may be using View Side by Side or two arranged windows. Check the window arrangement instead of changing page margins.
- You see columns inside one page: that is document formatting, rather than a page-view setting.
Do not delete page breaks or change margins merely to fix the screen view. Those actions can alter the document itself. A view problem should normally be solved with the View and Zoom controls.
Keep the View Comfortable While Editing
After changing the settings, move to another part of the document and check a page with both text and an image. Make sure the zoom is comfortable enough to read small labels, footnotes and captions.
A wider or maximised window may fit more content than a narrow one. If the display changes after moving Word between monitors, review zoom again before assuming the document layout has changed. Use print preview when you need to check the output rather than the editing view.
FAQs
How do I stop pages appearing side by side in Word?
Choose View → Vertical under Page Movement. If pages still fit beside each other, select One Page or increase the zoom.
Why is the zoom control disabled?
Side to Side page movement disables zoom selection. Switch to Vertical to use the zoom controls again.
Does this change my printed document?
No. Page movement and zoom change the editing view, rather than the document’s page size, margins or content.
Why do two pages still appear in Vertical mode?
A small zoom level and a wide window can fit more than one page across. Increase zoom until the view suits your screen.
Is One Page the best setting for typing?
It is useful for seeing a whole page. A larger zoom may be more comfortable for typing, even though you need to scroll.
Is View Side by Side the same as Side to Side?
No. View Side by Side compares separate documents. Side to Side changes page movement within a document.
Conclusion
Switch to Vertical first, then adjust zoom to suit the screen. This restores comfortable reading without disturbing the page layout you have already created. For the next step, see Open Two Documents Side by Side in Word: 2 Easy Steps (Quick Guide).
Related Tutorials
- How to View Two Pages Side by Side in Word: 2 Easy Methods (Quick Guide)
- Open Two Documents Side by Side in Word: 2 Easy Steps (Quick Guide)
- How to Remove a Page Break in Word: 4 Methods
Word Tutorials
Recent Microsoft Word Tutorials
Browse the complete collection for help with formatting, layout, pages, tables, images, and document setup.
For Microsoft support documentation, visit the official Microsoft guidance.
Leave a Reply