The fastest way to insert a word counter in Word is to use the built-in NumWords field — it places a live, printable count anywhere in your document and updates automatically whenever you reopen the file. The status bar at the bottom of the screen shows a count, but that number never prints, so it cannot be used as proof of word length on an assignment or report.
In this guide, you’ll learn how to add a word counter that prints with your document, how to fix the off-by-one count, how to label it cleanly, and how to move it to the bottom of the page without rebuilding it.
Why Add a Word Counter Inside a Word Document?
The word count in the status bar is convenient, but it lives outside the document. It will not print, it will not appear on a PDF export, and it cannot be submitted as evidence of length. An embedded counter solves all three problems in one move. It is particularly useful for:
- University or college assignments with strict word limits
- Academic essays and dissertations that must declare a final count
- Professional reports, grant proposals, and formal submissions
- Any document where the count must be visible on the printed page
Once the field is in place, you never have to retype the number. The count updates the moment you save and reopen, and a right-click refresh forces it to update on demand.
Watch the Video Tutorial
If you prefer to see this in action, the full video walkthrough is below, showing each method step by step.
How to Insert a Word Counter in Word: Step-by-Step
You only need to do this once. The steps below walk through the Quick Parts method, which is the most reliable way to insert a word counter in Word across every modern desktop version.
Method 1: How to Insert a Word Counter in Word Using Quick Parts
Quick Parts gives you direct access to Word’s field library, including the NumWords field that powers the embedded counter.
- Click inside the document where you want the count to appear — top of the page, near the title, or at the very end
- Open the Insert tab on the ribbon
- Click Quick Parts, then choose Field

👉 The Field dialog opens, listing every built-in field Word can place into your document.
Method 2: How to Insert a Word Counter in Word Using the NumWords Field
NumWords is the specific field that returns the document’s current word total. Selecting it from the Field dialog drops a live number straight into your cursor position.
- In the Field names list, scroll down and select NumWords
- Leave the default format selected on the right
- Click OK
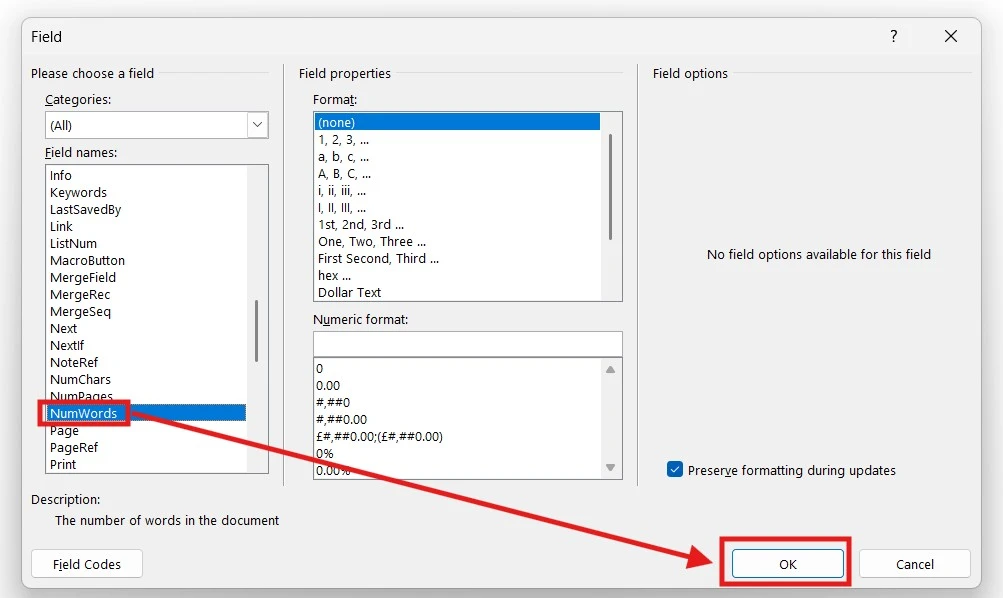
👉 A number appears at your cursor position, reflecting the current word count of the document.
Method 3: How to Insert a Word Counter in Word and Add a Label
A raw number on its own looks ambiguous. Adding a label turns the field into something a marker, examiner, or client recognises immediately.
- Click directly to the left of the inserted number
- Type Word Count: followed by a space
- Format it with bold, a larger size, or your preferred font — and if your assignment has formatting requirements, the guide on how to use double line spacing in Microsoft Word covers the standard academic setup

👉 You now have a clearly labelled counter that reads Word Count: 1,243 (or whatever your current total is) — ready to print, export, or submit.
Which Method Should You Use?
| Method | Best For | Effort |
|---|---|---|
| Quick Parts → Field | Getting to the NumWords option in any modern Word version | Low |
| NumWords field on its own | A clean, unlabelled count for designers or template builders | Low |
| NumWords field with a typed label | Academic submissions, reports, and anything that must read clearly on paper | Low |
For 90% of users — students, professionals, and anyone submitting formal work — Method 3 is the right choice. The label removes ambiguity and the field still updates automatically.
Common Problems When Inserting a Word Counter in Word
The number is lower than the status bar count
The NumWords field does not count itself when first inserted, so the number sits a few words behind the status bar. Right-click the field and choose Update Field — the count will jump to the correct total, and Word will refresh it automatically the next time you save and reopen the file.
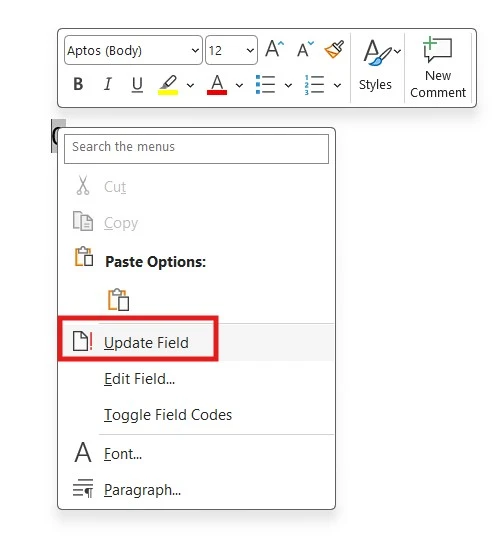
The count will not update when I type
This is normal — fields do not refresh on every keystroke. Press F9 with your cursor on the field to force an instant refresh, or right-click and choose Update Field. To update every field in the document at once, press Ctrl + A, then F9.
The number appears as grey shaded text
Grey shading means field shading is set to “Always” in Word’s options. The shading is only visible on-screen — it will not appear when printed or exported to PDF. To hide it on-screen, go to File → Options → Advanced and change Field shading to When selected.
The count prints as the word “NumWords” instead of a number
This means field codes are being displayed instead of field results. Press Alt + F9 to toggle back to results view, and the number will display correctly in both the document and on the printed page.
Pro Tips for Using the Embedded Word Counter
- Press Ctrl + X to cut the counter and Ctrl + V to paste it at the bottom of the page — the field stays live and keeps updating in its new position
- Always refresh the field with F9 right before printing or exporting to PDF so the final number reflects every edit
- Combine the counter with other Word shortcuts to speed up the rest of your formatting work — see the full Microsoft Word keyboard shortcuts cheat sheet for the complete list
- For submissions, place the counter immediately under your title or above your bibliography so a marker can find it without scrolling
FAQs
How do I insert a word counter in Word?
To insert a word counter in Word, click where you want the number to appear, then go to Insert → Quick Parts → Field, select NumWords from the list, and click OK. A live count will appear at your cursor position.
Can I add a word counter anywhere in the document?
Yes. The NumWords field can sit at the top, middle, or bottom of any page. You can also cut and paste it to a new location without breaking the link to the live count.
Does the word counter update automatically?
Yes. Word refreshes the count every time the document is saved and reopened. You can also force an update at any time by right-clicking the field and choosing Update Field, or by pressing F9.
Will the word counter print with the document?
Yes. Because the field is embedded in the document body, it prints, exports to PDF, and appears on any copy you share. The grey field shading you may see on-screen does not appear on the printed page.
Does the word counter count itself?
Not on first insert — the field appears slightly behind the true total. Right-click and choose Update Field, and the count will include itself. From then on, every refresh and reopen includes the field in the total.
Which versions of Word support the NumWords field?
Every modern desktop version of Word supports NumWords, including Word 2016, 2019, 2021, and Microsoft 365. Word for the web has limited field support, so the counter is best inserted in the desktop app.
Can I format the word counter text?
Yes. Treat the field exactly like normal text — apply bold, change the font, increase the size, or align it with the rest of the page. The live number behaviour is preserved no matter how you style it.
Conclusion
Once you know how to insert a word counter in Word, the status bar becomes optional. The NumWords field gives you a live, printable count that updates on save, refreshes on demand, and travels with your document wherever it goes — exactly what academic and professional submissions require.
Insert it once, label it clearly, and refresh it before you print. If you are preparing a sensitive submission, it is also worth learning how to password protect a Word document before sending it on.
Related Tutorials
- Microsoft Word Keyboard Shortcuts Cheat Sheet
- How to Use Double Line Spacing in Microsoft Word
- How to Insert Page Numbers in Microsoft Word

Recent Microsoft Word Tutorials

Looking for more help with Microsoft Word? Browse all step-by-step Word tutorials covering formatting, layout, pages, and document setup.
👉 View all Microsoft Word tutorials: https://wordmadeeasy.org/microsoft-word/
👉 Need more support – check out the official guidance: https://support.microsoft.com/en-au

Prefer watching instead of reading? Many Word tutorials are also available as short, step-by-step videos on the Word Made Easy YouTube channel.


Leave a Reply